Your Questions, Answered
We’ve assembled the most frequently asked questions about Eversense into one place. Got a question that you can’t find the answer to? Contact us.
Tell your health care professional if you have any skin conditions. The Eversense® adhesive patch should only be applied to intact, healthy skin.
The sensor uses fluorescence to measure glucose in interstitial fluid. It is inserted under the skin and provides glucose readings for up to 1 year. The sensor uses a unique fluorescent, glucose indicating polymer to measure glucose concentration based on the changes in light.
The sensor is approximately 3.5 mm x 18.3 mm and contains a small amount of dexamethasone acetate, an anti-inflammatory steroid drug. The dexamethasone acetate minimizes inflammatory responses, very similar to pacemakers.
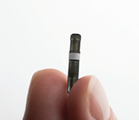
The Eversense® 365 Sensor is approximately 3.5 mm x 18.3 mm.
A certified health care professional will explain and perform the simple and quick steps to insert the sensor. You will be fully awake during the approximately 5-minute insertion procedure. (The entire procedure, including preparation, usually takes about 15 minutes.)
It is important to choose a site (on the upper arm) that is comfortable for you to wear the sensor and smart transmitter for up to 365 days. It is recommended to have the sensor inserted toward the back of the upper arm. Placement in this area minimizes the chance of the sensor and smart transmitter being bumped by doorways, walls or other narrow passages. It is recommended to avoid areas with loose skin, scars, tattoos, nerves, or blood vessels that could be incised during the procedure. It is recommended to alternate arms for subsequent insertion sites.
Step 1: Site preparation – the insertion site will be cleaned, disinfected, then anesthetized using lidocaine.
Step 2: Incision – a small (less than 1 centimeter) incision will be made at the insertion site.
Step 3: Sensor insertion – a subcutaneous pocket will be created under the skin and the sensor will be inserted in this pocket.
Step 4: Site closure – the incision will be closed with Steri-Strips™. Sutures are not usually required.
Step 5: Sensor and smart transmitter linking – link the sensor and smart transmitter to begin the 24-hour Warm-Up Phase.
Note: After insertion, link the smart transmitter and the sensor and then allow the incision site to heal 24 hours before wearing the transmitter.
The sensor requires 24 hours to stabilize within the insertion site, this period is known as the Warm-up Phase. After the first 24 hours of sensor insertion, position and secure the smart transmitter over the sensor on top of the Tegaderm® and ensure you have a connection. Then you can perform your Initialization Phase calibration of 4 fingerstick blood glucose tests to start getting glucose readings.
During the first few days after insertion, you will wear the smart transmitter over the Tegaderm. Leave the Tegaderm in place for as long as your health care provider instructs.
Your health care professional will explain and perform the simple and quick steps to remove the sensor. You will be fully awake during the approximately 5-minute removal procedure.
Step 1: Site preparation – the sensor site will be cleaned, disinfected, then anesthetized using lidocaine.
Step 2: Incision – a small (~ 5-6mm) incision will be made at the sensor site.
Step 3: Sensor removal – the sensor will be removed and discarded.
Step 4: Site closure – once removed, the incision will be closed with Steri-Strips™ (sutures may be used depending on provider’s preference).
The sensor incision site usually heals within a few days.
Always follow your health care professional’s instructions for care after the sensor insertion or removal.
Contact your health care professional if you have pain, redness, or swelling at the incision site(s) later than 5 days after the sensor insertion or removal, or if the incision has not healed within 5 to 7 days.
If you are concerned about incision site reactions at any time, contact your health care professional.
Still have questions?
The Eversense team is dedicated and ready to provide the answers and support you need. Simply click the link below.
The Eversense® 365 Continuous Glucose Monitoring (CGM) System is indicated for continually measuring glucose levels for up to one year in people (18 years and older) with diabetes. The system is indicated for use to replace fingerstick blood glucose (BG) measurements for diabetes treatment decisions. Fingerstick BG measurements are required for calibration one time a week after day 13, and when symptoms do not match CGM information or when taking medications of the tetracycline class. The sensor insertion and removal procedures are performed by a health care provider. The Eversense 365 CGM System is a prescription device; patients should talk to their health care provider to learn more.
For important safety information, see bit.ly/eversensesafety
Eversense, Eversense 365 Continuous Glucose Monitoring, and the Eversense logo are trademarks of Senseonics, Incorporated. All other trademarks are properties of their respective owners and are used solely for informative purposes. No relationship or endorsement should be inferred or implied.
Apple Watch® is a product of Apple, Inc., and may be separately purchased from an authorized Apple retailer. Apple Watch is not included with the Eversense CGM System. Android is a trademark of Google LLC.
MKT-001692 Rev 1


 Call My Eversense Specialist Now
 Schedule a Call